Accurate differential GPS measurements for each image allow you to achieve centimeter level accuracy for aerial surveys even without GCPs, which greatly reduces field work and time. Normally it requires the use of a ground-based reference station together with a rover which complicates the process and maybe error prone. An alternative solution is to use precise satellite information from a global tracking network to obtain centimeter-level accuracy without a base station while increasing the reliability of the final result.
MakeItAccurate is a GNSS data post-processing service that does not require base station data to achieve very high accuracy. MakeItAccurate uses a combination of the latest PPP (precise point positioning) precise clock and ephemeris corrections technology with ground station data in the region. Processing can happen shortly after finishing the mission.
The achievable positioning accuracy using MakeItAccurate is 2-3cm in many countries and up to 10cm at worst in very remote areas. MakeItAccurate will estimate the expected accuracy for the project based on the data quality and available ground station data. While high accuracy can be achieved without a base station, users can import their own base station data for traditional PPK processing. This is appropriate for sites such as mines with custom coordinate systems and permanent base stations.
In this tutorial, we will explain how to use MakeItAccurate together with Agisoft Metashape to process and improve the accuracy of GNSS data up to 3 cm XYZ without any input other than the original rover data. This workflow is suitable for DJI RTK drone users (DJI Phantom 4 RTK or M210 v2 RTK) as well as for any drones with GNSS kinematic data or static control station data.
The following instructions describe the processing workflow based on the DJI Phantom 4 RTK drone.
- Create a flight mission for your drone
- Perform the flight
- Process PPK data
- Create Agisoft Metashape project
- Align images
- Proceed with the remaining processing steps
Create a flight mission for your drone
MakeItAccurate requires raw satellite observation data to be recorded during the flight (PPKRAW.bin, EVENTLOG.bin, Rinex.obs and Timestamp.MRK files). These files are recorded automatically if you are using Photogrammetry flight planning methods in DJI GS Pro, or Mapping and Oblique flight planning methods in DJI Pilot. They are not recorded for Waypoint missions or in manual flight mode.
Also, be sure to consider our shooting recommendations:
- don't set side overlap less than 60% and forward overlap less than 80% to get good quality results;
- use a double grid flight plan for best accuracy.
You can find a more detailed description of recommendations of shooting in our solutions - Image Capture Tips.
Perform the flight
Make sure to follow all safety precautions before making the flight.
After the flight is complete, copy the survey data from the microSD card including images and GPS data files.
Process PPK data
Log in to your account on the MakeItAccurate website. Create a new DJI P4RTK job.

Click Upload files button and select all files from the DJI survey folder including images and GPS log files.

Click Processing options button.

On the Processing options page select a coordinate system to use. It is recommended to select the same coordinate system that you will be used for data export. If you are planning to export data in WGS84 or UTM coordinate systems, select WGS84(G1762).
At this stage, a summary of the expected accuracy will be displayed without using any user-provided base station data. You can proceed to the next step without importing base station data. As mentioned earlier, it is also possible to import use base station data for post-processing to achieve better than 3cm accuracy with up to 50km baseline distance.
The estimated processing cost is per processing job. Discounted bulk processing credits can be pre-purchased on request.
Click Review and process button.

On the review and process page verify all the processing parameters and click Start processing button.

Once processing is finished, click Download Results button.

A Zip archive with 2 files will be downloaded – one with orthometric and one with ellipsoidal heights. We recommend to use ellipsoidal heights for Metashape processing.
Accuracy depends on the data you have uploaded, the number of satellite constellations tracked, the duration and location of the project. You can find a detailed description of possible accuracy on the MakeItAccurate website under How Accurate is MakeItAccurate.
Create Agisoft Metashape project
Start Agisoft Metashape. Select Add Photos... command from Workflow menu (Workflow > Add Photos...) and add all images from the DJI survey folder.

Metashape will automatically load GPS coordinates recorded in EXIF meta data during the flight.
Click Import Reference button on the Reference pane toolbar to load more accurate PPK processing results.

Select Character-separated values file type and browse to the ellipsoidal heights file downloaded from MakeItAccurate service.
In Import CSV dialog select the same coordinate system you specified in the MakeItAccurate processing options (WGS84 in our example). Select Tab value in the Delimiter section. Turn on Accuracy import option for image coordinates and turn off Rotation import option.
Set up the column indices according to the Columns Order description in the file header.
Please note that column indices for Latitude accuracy and Longitude accuracy will be the same.
Click OK button to import PPK coordinates.

Click Save As... command from File menu (File > Save As...) and save created Metashape project on your computer.
Align images
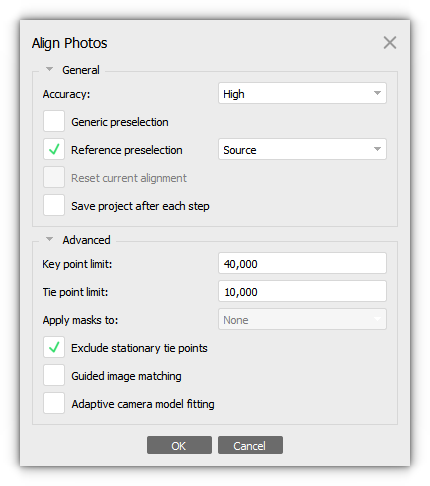
Select Align Photos… command from the Workflow menu (Workflow > Align Photos...) to perform image alignment.
Configure suitable parameters in Align Photos dialog. In most cases, you will be using High accuracy, Reference preselection options turned on and Reference preselection mode set to Source. Click OK to start image alignment.
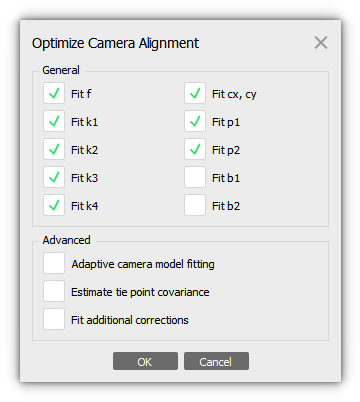
Due to large distortions of the Phantom 4 RTK camera, it is recommended to perform the adjustment with an additional K4 calibration coefficient. To do that select Optimize Cameras… command from the Tools menu. In Optimize Cameras dialog select Fit k4 parameter in the General section and click OK to perform an adjustment.
If you are going to set up control or check points, it is a good time to do that after image alignment is complete. For additional details please check Aerial data processing with GCPs tutorial. Please don’t forget to run Optimize Cameras command once again after placing markers to make sure they are taken into account in the final solution.
Proceed with the remaining processing steps
After image alignment is complete, you can proceed with other processing steps such as required for your project: build point cloud; building digital elevation model (DEM); building orthomosaic, build tiled model. You can find a description of these steps in our solutions - Aerial data processing.