Starting from Agisoft Metashape Professional 1.8 supports data processing of smart cameras with a depth sensor. The article describes an example of how to add images with depth maps to a project.
The article will consider options when depth maps can be stored as an attribute of an image, or depth maps can be saved in a separate file.
Workflow:
Depth sensor is installed on the range of Apple devices with TrueDepth camera, that is the selfie camera (Portrait mode) of iPhone starting from the 10th version (except SE) and the front camera of iPad pro.
Depth maps provided by the iPhone rear camera (with LiDAR as well) are not suitable for surface reconstruction.
Also the depth format is embedded by the Google Camera application in portrait mode. The list of smartphones is limited to the devices with distance measuring capabilities that are supported by the Google Camera application.
Please note that the most devices store not calibrated depth data used for visual effects, but not suitable for photogrammetry purposes.

Valid depth data is expected to be in real units (meters, millimeters, etc) which are specified in the photo XMP metadata.
Import Depth Images
One image (depth information is recorded as an additional attribute of the captured images)
For TrueDepth camera and for Google Camera application format the depth information is recorded as an additional attribute of the captured images you need to use Import Depth Images command via GUI.
Sample data is available on our website - https://www.agisoft.com/downloads/sample-data/
The Import Depth Images command is intended to be used only for RGBD images from smartphones equipped with TOF depth sensor or similar devices. Select File > Import > Import Depth Images. In the Open dialog select the desired photos (select the source images) and click Open button :

After that select the directory to which the preprocessed photos will be saved. Click Select Folder button:

Select Single cameras option in the Add Photos dialog window and click OK button:

The Import Laser Scans command was used for such images in Metashape Pro 1.8. Select File > Import > Import laser scans command. In the Import Laser scans dialog select the desired photos (select the source images) and the directory to which the preprocessed photos will be saved.
The images will be uploaded to the project. To view depth maps, enable the Show Depth Maps button on the Toolbar:

Separate files (depth information is saved by the camera as a separate image file)
In a separate case when depth information is saved by the camera as a separate image file it is recommended to use a script to import data. The dataset from such camera would include two subsets of images: color photos and images with depth maps. Use the script outlined below to import the depth information to Metashape Pro
Metashape.app.document.chunk.importLaserScans(filenames = ["/path/to/depth/image-1"], color_filenames = ["/path/to/corresponding/color/image-1"], image_path = "/path/to/destination/folder/{filename}.tif");Where:
- filenames - array of depth map paths;
- color_filenames - array of color photo paths;
- image_path - path template for preprocessed photos.
If multiple images are used, then their paths should be separated by commas. Example:filenames = ["//example/IMG_0860_depth.tif", "//example/IMG_0861_depth.tif", "//example/IMG_0862_depth.tif"]
Or you can use the following commands and select all TIFF files from each folder (with depth map, and folder with RGB images):
Metashape 2.x
import Metashape
filenames = Metashape.app.getOpenFileNames() #select all TIFF files from "Depth maps" folder
color_filenames = Metashape.app.getOpenFileNames() #select all JPEG files from "RGB" folder
Metashape.app.document.chunk.importDepthImages(filenames=filenames , color_filenames=color_filenames , image_path = "D:/New Folder/{filename}.tif") #command for Metashape 2.0
Metashape 1.8
import Metashape
filenames = Metashape.app.getOpenFileNames() #select all TIFF files from "Depth maps" folder
color_filenames = Metashape.app.getOpenFileNames() #select all JPEG files from "RGB" folder
Metashape.app.document.chunk.importLaserScans(filenames=filenames , color_filenames=color_filenames , image_path = "D:/New Folder/{filename}.tif") #command for import in Metashape 1.8
After running the script the images with depth maps will be added to the project:

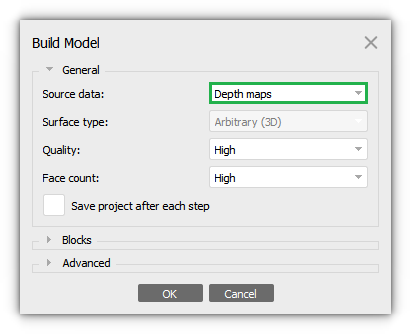
Build Model
For this case, when you are using images with depth maps, you need to select Source data - Depth maps in the Build Model dialog window (select Workflow > Build Model). The algorithm will use the automatically imported depth maps: